Navigating the Capture Engine Manager window
To start the Capture Engine Manager from the Omnipeek computer:
• Choose > > > . The Capture Engine Manager appears.
• On the menu, click . The Capture Engine Manager appears.
The parts of the Capture Engine Manager window are described below.
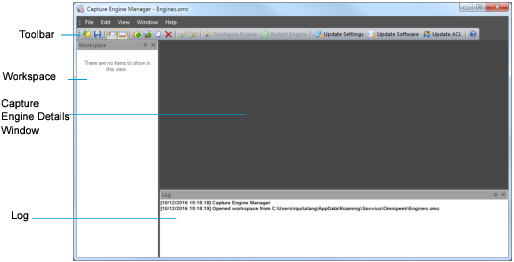
• Toolbar: The toolbar allows you to control the following program functions:

• Open: Click to open a Capture Engine Manager Workspace (*.omc) file.
NOTE: Opening a Capture Engine Manager Workspace (*.omc) file other than the engines.omc default file (located in C:\Users\\AppData\Roaming\LiveAction\Omnipeek) , will no longer synchronize the list of Capture Engines displayed in Omnipeek and Capture Engine Manager.
• Save: Click to save the Capture Engine Manager Workspace (*.omc) file.
• View Workspace: Click to hide/show the Workspace pane.
• View Log Window: Click to hide/show the Log pane.
• Insert Group: Click to insert a new Capture Engine group.
• Insert: Click to insert a new Capture Engine.
• Delete: Click to delete the selected Capture Engine group or single Capture Engine.
• Connect: Click to display the Connect dialog, allowing you to connect to the selected Capture Engine. See Connecting to a Capture Engine.
• Disconnect: Click to disconnect the Capture Engine Manager from the Capture Engine displayed in the active window.
• Configure Engine: Click to start the Capture Engine Configuration Wizard to configure the Capture Engine. See Configuring a Capture Engine.
• Update Settings: Click to update the settings for Filters, Alarms, or Graphs for the Capture Engine. See Updating Capture Engine settings.
• Update Software: Click to update the Capture Engine software for one or more Capture Engines using the Update Service.
• Update ACL: Click to distribute a single Access Control List (ACL) to multiple Capture Engines running on machines belonging to the same Domain. See Updating Capture Engine ACL settings.
• Help Topics: Click to display online help for the Capture Engine Manager application.
• Workspace: This area displays the list of currently defined Capture Engines. Both Omnipeek and Capture Engine manager maintain the same list of Capture Engines. Making a change in either program automatically updates the list in the other program.
NOTE: Right-click inside the Workspace to display a context-menu with additional options for displaying the list of Capture Engines; inserting and discovering Capture Engines; editing, deleting, or renaming Capture Engines; connecting and disconnecting Capture Engines; forgetting all passwords; and importing and exporting Capture Engines.
• Capture Engine Details window: This area displays the details and tabbed views for the Capture Engine. Each Capture Engine window can also have an Analysis Modules and Audit Log view, in addition to Status, Filters, Alarms, and Graphs views. Double-click any Capture Engine in the Workspace to view the details for that Capture Engine.
• Log: This area shows the messages sent to the Log file, including program start and the status of update tasks.
• You can right-click inside the log to save, copy, or clear the contents of the Log file.
• Choose > to save the Log file as a text file.
TIP: You can float the Workspace and Log panes, or drag either to dock it in a different location. To toggle between floating and docking, double-click the title bar of the window.